• HOME
  • ABOUT
  • CONTACT US
  • DISCLAIMER
  • SITEMAP
  • PRIVACY
facebook twitter instagram pinterest bloglovin Email

FUN COOKING

Find Good and Natural Recipes

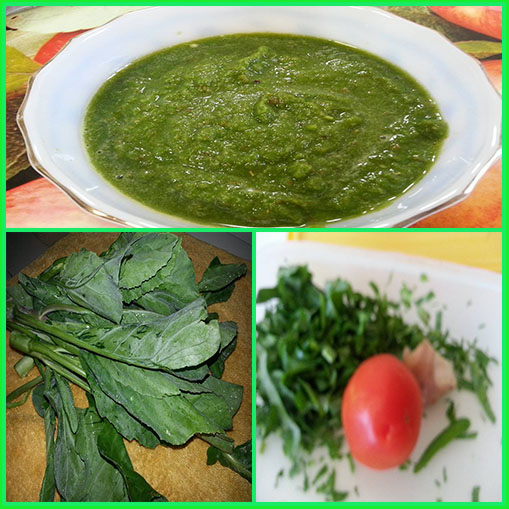
Kale Leaves/Phak-ka-na is a very healthy leafy vegetable which is full of iron and fibers. Today I made its chutney. Here below is full process of  its making:
Ingredients
handful of chopped tender kale/phakna leaves
1 chopped green chili
1 inch piece of ginger
1 ripe tomato
salt to taste
2 tbsp of lime juice
1 tbsp of coconut powder (optional)
1/4 tsp of garam masala
1 tsp of whole coriander
Method
1.  Wash and chop the tender leaves of phak-ka-na, chili, ginger and tomato.
2. Take the whole coriander, tomato, ginger, chili and kale leaves in a big container of blender with lime juice and blend it till smooth with little bit of water.
3. Next add salt, garam masala and coconut powder and blend it again.
4.  Kale chutney is ready. Transfer it into a serving bowl.
Enjoy Healthy Cooking!!!
See more recipes:
How to steam corns in microwave   
Healthy Bhutta or Corn   
Palak (Spinach) Chutney     
Marua ( Sweet Basil) chutney     
Sweet and Sour Guava dip     
Cabbage & Papaya Seeds chutney     
Cucumber Peels Chutney     
Leftover Lemon Zest Jam or chutney    
Instant Pineapple Dip     
Tori Peels Chutney    
Hummus     
chatpate Orange Peels     
Ripe Banana Chutney  
Kairi chutney  
 Red chutney   
Coconut Malai chutney  
 Sandesh/Paneer Peda  
Moong Dal Kachori 
Peas Chutney
                                    --------------
Reproduction of the contents of this blog, without permission, in whole or in part is strictly prohibited.
Share
Tweet
Pin
Share
No comments
Cucumber/kheera is generally eaten as salad.  Earlier I have written kuttu ke aate ka chilla in which I have used cucumber too.  Today I made its coarse textured chutney. Here below is its full recipe:
Ingredients
2-3 small cucumber
2 ripe tomatoes
1 tbsp of grated ginger
handful of cilantro
2 fresh green chilies
1medium sized onion
2 tbsp of lemon juice/white vinegar
1 tsp of garam masala
salt to taste
Method
1.  Wash the cilantro, ginger, green chilies and cucumbers.
2. Peel and cut the cucumbers and onion roughly. Chop the green chilies and cilantro too. Grate the ginger or it can be finely chopped too.
3. Take onion, green chilies and ginger in vegetable chopper and chop it first. After that add cucumbers, coriander powder, cilantro, lime juice, salt and tomatoes. Blend it into the vegetable chopper till coarse chutney. 
4.  Chatpati cucumber chutney is ready to serve.
Enjoy Healthy Cooking!!!
See more recipes:
How to steam corns in microwave    
Healthy Bhutta or Corn    
Palak (Spinach) Chutney      
Marua ( Sweet Basil) chutney      
Sweet and Sour Guava dip      
Cabbage & Papaya Seeds chutney      
Cucumber Peels Chutney      
Leftover Lemon Zest Jam or chutney      
Instant Pineapple Dip      
Tori Peels Chutney      
Hummus     
chatpate Orange Peels      
Ripe Banana Chutney  
Kairi chutney  
Red chutney   
 
Coconut Malai chutney  
Sandesh/Paneer Peda   
 
Moong Dal Kachori   
Peas Chutney 
Kaju chutney
Podina Payaji chutney 
                                        ----------------
Reproduction of the contents of this blog, without permission, in whole or in part is, strictly prohibited.
Share
Tweet
Pin
Share
No comments
Podina pyaji chutney were used to make in coarse texture with kundi sota in our childhood. I tried it to make it in the same texture in vegetable chopper.  It goes well with dal in main course.  Here below is how we can make it:
Ingredients:
handful of fresh mint leaves/podina
two tsp of grated jaggery
1 tsp of tamarind paste
1 medium sized onion
salt to taste
1 tsp of coriander powder
1/4 sp of garam masala
1 tsp of grated ginger
1 green chili
Method
1.  Wash the mint leaves, peel and roughly chop the onion, ginger, and chop green chili.
2,  Take mint leaves, onion, ginger, green chili and jaggery, tamarind paste in the container of vegetable chopper and blend or chop in it till coarse texture.
3.  Next add salt, coriander powder, and garam masala and mix it again for few second.
4. Podina payaji chutney is ready and transfer it into a serving bowl.
Tip
 Instead of jaggery and tamarind, imli chutney can be used.
Enjoy Healthy cooking!!!
See more recipes:
How to steam corns in microwave   
Healthy Bhutta or Corn   
Palak (Spinach) Chutney     
Marua ( Sweet Basil) chutney     
Sweet and Sour Guava dip     
Cabbage & Papaya Seeds chutney     
Cucumber Peels Chutney     
Leftover Lemon Zest Jam or chutney     
Instant Pineapple Dip     
Tori Peels Chutney     
Hummus    
chatpate Orange Peels     
Ripe Banana Chutney 
Kairi chutney  
 Red chutney   
Coconut Malai chutney  
 Sandesh/Paneer Peda   
Moong Dal Kachori  
Peas Chutney
Kaju chutney 
                                          --------------
Reproduction of the contents of this blog, without permission, in whole or in part, is strictly prohibited.
Share
Tweet
Pin
Share
No comments
Lemons are an excellent  source of vitamin C and having many many health benefits. We consume it in many recipes just like drinks, chaats, sabzis, cakes, desserts, syrups, soups, pickles etc etc. Today I am writing the recipe of  oil and preservative free spicy lemon pickle.  Here below is the full details: 
Ingredients
8 medium sized lemons
1.5 tsp of  black salt or salt or sendha namak
1 tsp of red chili powder
1 tsp of garam masala
1tsp of turmeric powder
1/2 tsp of black pepper powder
1 tsp of fenugreek powder (optional) 
1/4 tsp of ajvain (optional)
Method1. Wash the lemons and dry it with a clean cloth.
2.  Cut the lemons into desired pieces.
3.  Now take these lemons pieces in a glass or ceramic bowl.  Add salt or black salt or sendha namak, red chili powder, turmeric, black pepper powder, fenugreek powder, ajvain and garam masala.  Mix all thoroughly with lemons pieces with hand or with two forks.
4. Now put it into a sterlized and dry glass bottle.
5.  Keep it in the sun for 1 week days or till its peels slightly tender. Shake everyday. For getting it tender, it may take one week or even more days, depending on the weather of the place.
6.  Chatpata sour lemon pickle is ready to enjoy.
7.  Keep it in the refrigerator as it is oil free and without preservative.Generally, I keep in chill tray of refrigerator.
Tips 
1. For vrats and fasts, use sendha salt for making this pickle.
2.  Black salt enhances its taste. So add both the salt or any one.
3. Always use the dry spoon for taking out the pickle from bottle.
4. Shake bottle twice a day till it gets ready.

Enjoy Healthy cooking!!!
See these posts too:
Lemon Peels Pickle 
Kharbooja Pickle   
Fresh Green Pepper corn in Lime Juice    
Chatpate Orange Peels  
Fresh chilies in Vinegar 
Plain Sawalee or Mathri    
Mathi or Mathiyan   
Bamboo shoots Pickle   
Mooli Parantha   
Besan Ka Parantha    
Ajvain Leaves (ornamental) Parantha    
Boiled rice Parantha    
Ajvaini Lachha Parantha   
Methi Wali Makki roti        
Madan/Matan Pickle
                                                   ----------------
Reproduction of the contents of this blog, without permission, in whole or in part, is strictly prohibited.
Share
Tweet
Pin
Share
No comments
This basil chutney is having a unique taste due to combination of marua, tender coconut malai and cumin seeds.  Here below is how I made it:
Ingredients
1 cup of marua/sweet basil
1 large chopped tomato
2 green chilies
1 inch piece of ginger
1 tsp of cumin seeds
 malai of 1 tender coconut
salt to taste
2 tbsp of white vinegar
Method
1.Wash the leaves with water.
2. Chop ginger, coconut malai, green chilies and tomato.
3.Take the marua leaves, tomato, ginger, green chilies, cumin seeds, coconut malai salt and vinegar in container of mixer grinder and blend till it gets smooth texture.
4. Khatti Meethi coconut malai and basil chutney is ready and transfer it to the serving bowl.
Enjoy Healthy Cooking!!!
See more recipes:
Palak (Spinach) Chutney
Marua ( Sweet Basil) chutney 
Sweet and Sour Guava dip 
Cabbage & Papaya Seeds chutney 
Cucumber Peels Chutney 
Leftover Lemon Zest Jam or chutney 
Instant Pineapple Dip 
Tori Peels Chutney 
 Hummus 
chatpate Orange Peels
Tahini
Red Chutney 
Kairi chutney 
Peas chutney 
Singre KI chutney 
Kamrakh ki Longi 
Coconut Malai chutney 
Bhutte ki Chutney 
Ripe Banana chutney 
Chutney of thorny tori Peels 
                                          --------------------
Reproduction of the contents of this blog, without permission, in whole or in part is strictly prohibited.
Share
Tweet
Pin
Share
1 comments
Radish pods are also known as moongre, mongre,,singre etc. These are used raw as well cooked too. It has many health benefits.  today I am writing about its chutney. Here below it is:
Ingredients
handful of moongre/singre (long or small)
1 fresh chili
1 tbsp of grated ginger
salt to taste
1 medium sized tomatoes
1 tsp of lime juice or 2 tbsp of curd
1/4 tsp of garam masala
Method
1. Wash the moongre, chili, tomatoes and ginger.
2.  Chop all roughly.  Here I am using small tomatoes though I have written medium sized. Any size of tomatoes can be used.
3. Now take all the ingredients in mixer container and blend it till roughly smooth. Though lime juice can be used but curd taste makes it more delicious.
4. Transfer it into a serving small bowl.  Chatpati  chutney of singre/moongre, is ready to serve.
Enjoy Healthy Cooking!!!
See more recipes:
How to steam corns in microwave 
Healthy Bhutta or Corn 
Palak (Spinach) Chutney  
Marua ( Sweet Basil) chutney  
Sweet and Sour Guava dip  
Cabbage & Papaya Seeds chutney  
Cucumber Peels Chutney  
Leftover Lemon Zest Jam or chutney  
Instant Pineapple Dip  
Tori Peels Chutney  
Hummus  
chatpate Orange Peels  
Ripe Banana Chutney
Kairi chutney 
Red chutney 
Coconut Malai chutney 
Sandesh/Paneer Peda 
Moong Dal Kachori 
                                       -------------
Reproduction of the contents of this blog, without permission, in whole or in part is strictly prohibited.

Share
Tweet
Pin
Share
No comments
Older Posts

About me

About Me


COOKING SPEAKS TO ALL MY SENSES

Follow Us

  • facebook
  • twitter
  • instagram
  • Google+
  • pinterest
  • youtube

Categories

recent posts

Sponsor

Facebook

Blog Archive

  • August 2018 (62)
  • July 2018 (4)
  • June 2018 (4)
  • May 2018 (3)
  • April 2018 (4)
  • March 2018 (4)
  • February 2018 (2)
  • January 2018 (3)
  • December 2017 (4)
  • November 2017 (3)
  • October 2017 (3)
  • September 2017 (4)
  • August 2017 (3)
  • July 2017 (5)
  • June 2017 (4)
  • May 2017 (2)
  • April 2017 (3)
  • March 2017 (3)
  • February 2017 (3)
  • January 2017 (4)
  • December 2016 (4)
  • November 2016 (4)
  • October 2016 (4)
  • September 2016 (5)
  • August 2016 (4)
  • July 2016 (3)
  • June 2016 (4)
  • May 2016 (3)
  • April 2016 (4)
  • March 2016 (4)
  • February 2016 (3)
  • January 2016 (4)
  • December 2015 (4)
  • November 2015 (5)
  • October 2015 (4)
  • September 2015 (4)
  • August 2015 (5)
  • July 2015 (1)
  • November 2014 (1)
  • July 2014 (2)
  • June 2014 (2)
  • May 2014 (2)
  • April 2014 (1)
  • March 2014 (2)
  • February 2014 (2)
  • January 2014 (5)
  • December 2013 (4)
  • November 2013 (2)
  • October 2013 (4)
  • September 2013 (2)
  • August 2013 (2)
  • July 2013 (4)
  • June 2013 (3)
  • May 2013 (4)
  • April 2013 (3)
  • March 2013 (4)
  • February 2013 (4)
  • January 2013 (4)
  • December 2012 (5)
  • November 2012 (3)
  • October 2012 (5)
  • September 2012 (6)
  • August 2012 (5)
  • July 2012 (4)
  • June 2012 (5)
Created with
Copyright © FUN COOKING