• HOME
  • ABOUT
  • CONTACT US
  • DISCLAIMER
  • SITEMAP
  • PRIVACY
facebook twitter instagram pinterest bloglovin Email

FUN COOKING

Find Good and Natural Recipes

Sago/sabudana/sagudana kheer is very delicious and generally made during fasts.  Its making is very easy.  Here below is how we can prepare it:
Ingredients
1 cup of small sagodana
5 cups of milk
1/2 cup of sugar
3 tbsp of sliced almonds and other dry fruits
few raisins/kishmish
Method
1.  Clean and wash sago with water.  Drain out the water immediately and press downwards the washed sago in the same bowl.
2.  Keep it aside for 1 hour. After 1 hour  fluff and loosen it with fingers or any fork.
3.  Take 5 times mopre milk to sago.  If 1 cup is sago then take 5 cups of milk.  Keep the milk in a deep pan/patila/topia on heat.  Let it boil.
4.  As soon as it starts boil, lower the heat and add soaked sago and constantly stir it with with spatula/kadchi/.
5.  When it becomes translucent, add sugar and cook it for few minutes while stirring.
6.  Remove from heat. 
7.  Add some slices almonds, cashews,pistachios and raisins.  
8. Delicious sago keer is ready to serve.
Enjoy Healthy cooking!!!
See more recipes:
 Oats Burfi      
Oats Poha       
Oats Pakore (Sandwichmaker) 
Chatpati Oats Chaat       
 
Shakkar Paare or Khurma      
Petha Mithai    
Burfi of Left over Chashni of Petha Mithai        
Shakkar Paare or Khurma          
Sugar Coated phulia or Murmure   
Boondi Ladoo       
 
Oats Burfi      
Chocolate Squares      
Sugar Coated Sawalee 
 Moong Dal Halwa
 
Sooji Halwa  
AAte ka Halwa  
Chocobar Ashrfis 
                                      ------------------------
Reproduction of the contents of this blog, without permission, in whole or in part, is strictly prohibited.
Share
Tweet
Pin
Share
No comments
Japanese cucumbers are generally thin skinned and never bitter in taste. In this raita, I have used japanese cucumber and Marua leaves.  It is very cool and refreshing.  Here is how I made it:
 Ingredients
1.5 cup of curd
1 grated Japanese cucumber
few sweet basil (marua) leaves
1/4 tsp of crushed black pepper
salt to taste
1/2 tsp of sugar (optional)
1/2 tsp of roasted cumin powder
1/2 tsp of garam masala
1/2 finely chopped green chili (optional)
Method
1.  Wash the cucumber and sweet basil leaves.
2.  Grate the cucumber and roughly chop the sweet basil leaves.
3.  Beat the curd with spoon. Dissolve the sugar. If thin skinned, no need to peel. Today I have peeled it.
4.  Add grated cucumber and marua leaves .
5. Now add salt, black pepper, garam masala, cumin powder, and green chili.  Mix properly with spoon.
6.  Cool and refreshing cucumber and marua raita is ready to serve.  Serve chilled.
Enjoy Healthy Cooking!!!
See these posts too:
Tamarind Fruit raita   
Loki raita    
Brinjal Raita   
Pineapple Raita   
Bread Boondi Raita    
Jhatpat Dahi Bada chaat   
Petha Mithai   
Burfi of Left Over Chashni of Petha Mithai   
Palak Lassi   
Kharbooje ki Lassi 
winter Melon Raita  
How to make Cumin Powder  
Yellow (Pumpkin) Kheer  
Yellow Pumpkin Chutney 
                                         -------------
All rights are reserved.
Reproduction of the contents of this blog without permission, in whole or in part is prohibited.


Share
Tweet
Pin
Share
No comments
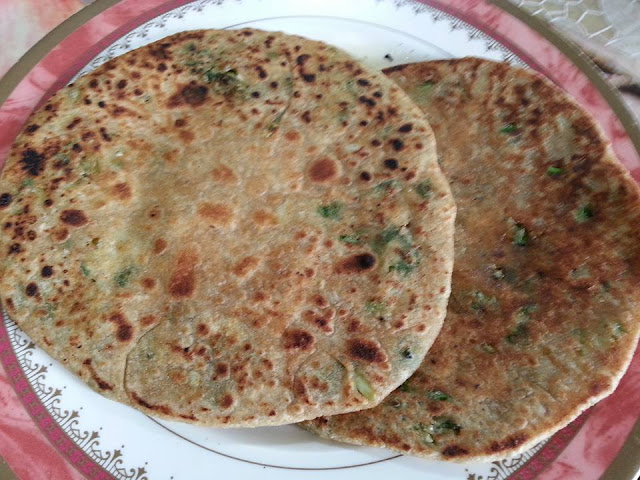
Gobhi/cauliflower purontha/parantha is very popular in Haryana and Punjab region.  It is made in the breakfast.  Becomes more tasty if accompanied with butter. Its making is very easy and simple.  Here below is the whole process how we can make it:
Ingredients
1 small size cauliflower
1" piece of ginger
1 small onion
1 fresh green chili
salt to taste
1 tsp of garam masala
1 tsp of coriander powder
handful of chopped cilantro
2 cups of wheat flour
1 cup of water
1/4 cup of flour for rolling
oil
Method
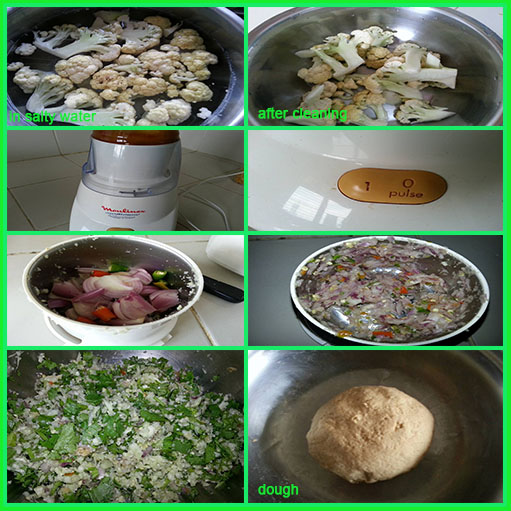
1.  Wash and cut cauliflower in small florets.  Soak in warm salty water for 10 minutes. Next clean it very carefully to make it worm free.
2. Now take out from water and keep it in any sieve to remove extra moisture for few minutes.
3. Next take few florets in small zar of mixer and pulse it 5-6 times or grate it with grater box. Pulse t the remaining florets similarly.
4. Peel the onion and ginger.  Now cut roughly chili, ginger and onion. Again pulse them for 4-5 times. 
or
Cut finely onion and ginger with hand if not very good in rolling the stuffed parantha. As done in the mixer zar on pulse contains little bit moisture.
5.  Now mix the cauliflower, onion, chili and ginger mixture together. Add salt, coriander powder and garam masala just before we start making parantha.
6. Take the wheat flour in a big bowl and make a soft dough with 1 cup of water. Keep it aside for 10 minutes.
7.  Now make four balls out of the dough.
8.  Roll it with rolling pin just like roti in round shape.  Put handful of stuffing on it and gather from all sides and make flat ball of it.
9.  Now  roll this stuffed flat ball into the dry flour and slighly press it with hands and then roll it with rolling pin on wooden surface/chakla with very light hand.
10.  Place this stuffed and rolled parantha on the heated tava,/pan etc.  when one side seems dry turn it to the other side.
11.  After that apply oil to both sides and cook it till crisp.
12.  Delectable gobhi parantha/purontha is ready to serve.
Enjoy Healthy cooking!!!
See more recipes:
Kuttu Flour Puda or Chilla    
Chili Chilla  
Spicy Grilled Baby Corn Kabab    
Namkeen Puda or Chilla
Bread Tikki chaat  
Corn stuffed Mirch Pakoras    
Double Colored Rice Poori    
Kale Patra or Patoud
Mathi or Mathiyan    
Papaya Parantha       
Kuttu &sweet Potato Roti      
Ajvaini Lacha Parantha      
Boiled Rice Parantha    
Bread Loaf    
Mooli Wali Makki roti   
Plain Makki Ki Roti   
sweet Bread (Tutti Frutti) 
Totilla's bhatoore
Tortilla Tandoori roti                                        
                                            --------------------
Reproduction of the contents of this blog without permission, in whole or in part is strictly prohibited.
Share
Tweet
Pin
Share
No comments
Newer Posts
Older Posts

About me

About Me


COOKING SPEAKS TO ALL MY SENSES

Follow Us

  • facebook
  • twitter
  • instagram
  • Google+
  • pinterest
  • youtube

Categories

recent posts

Sponsor

Facebook

Blog Archive

  • August 2018 (62)
  • July 2018 (4)
  • June 2018 (4)
  • May 2018 (3)
  • April 2018 (4)
  • March 2018 (4)
  • February 2018 (2)
  • January 2018 (3)
  • December 2017 (4)
  • November 2017 (3)
  • October 2017 (3)
  • September 2017 (4)
  • August 2017 (3)
  • July 2017 (5)
  • June 2017 (4)
  • May 2017 (2)
  • April 2017 (3)
  • March 2017 (3)
  • February 2017 (3)
  • January 2017 (4)
  • December 2016 (4)
  • November 2016 (4)
  • October 2016 (4)
  • September 2016 (5)
  • August 2016 (4)
  • July 2016 (3)
  • June 2016 (4)
  • May 2016 (3)
  • April 2016 (4)
  • March 2016 (4)
  • February 2016 (3)
  • January 2016 (4)
  • December 2015 (4)
  • November 2015 (5)
  • October 2015 (4)
  • September 2015 (4)
  • August 2015 (5)
  • July 2015 (1)
  • November 2014 (1)
  • July 2014 (2)
  • June 2014 (2)
  • May 2014 (2)
  • April 2014 (1)
  • March 2014 (2)
  • February 2014 (2)
  • January 2014 (5)
  • December 2013 (4)
  • November 2013 (2)
  • October 2013 (4)
  • September 2013 (2)
  • August 2013 (2)
  • July 2013 (4)
  • June 2013 (3)
  • May 2013 (4)
  • April 2013 (3)
  • March 2013 (4)
  • February 2013 (4)
  • January 2013 (4)
  • December 2012 (5)
  • November 2012 (3)
  • October 2012 (5)
  • September 2012 (6)
  • August 2012 (5)
  • July 2012 (4)
  • June 2012 (5)
Created with
Copyright © FUN COOKING