• HOME
  • ABOUT
  • CONTACT US
  • DISCLAIMER
  • SITEMAP
  • PRIVACY
facebook twitter instagram pinterest bloglovin Email

FUN COOKING

Find Good and Natural Recipes

Cucumbers are low in calories,carbs, sodium, fat and cholesterol.  When we eat any parantha we consume lots of calories only in the stuffing of parantha.  Here I have made cucumber sandwich parantha, very low calories in its stuffing but no compromise with its taste.  Here below is its full recipe details: 
Ingredients
2 cups of wheat flour
1 cup of water
Stuffing
2 grated big cucumber
1 tbsp of finely chopped ginger
2 tbsp of finely chopped onion
1/4 cups of finely chopped cilantro/drumstick leaves
salt to taste
1 finely chopped green chili
1 tbsp of coriander powder
1 tsp of garam masala
Method
1.  Wash, and grate the big cucumber with greater which has big holes. Squeeze the  grated cucumber with hand or  take this grated cucumber in a cloth and squeeze it both hands just like we squeeze clothes.  There should not be left any water. Save this water in a bowl and use for kneading the dough.
2.  Take the wheat flour in a bowl and knead a soft dough with water+the squeezed water.  Keep if for rest for 10 minutes.
3.  Now add all the ingredients  to the grated and squeezed cucumber. Mix well.
4. Knead the dough again for few minutes till smooth.
5. Heat the tava or non stick pan.
6.  Make  very small two balls out of the dough and roll very thin rotis with the help of dry flour.
7.  Now spread evenly handful of cucumber mixture on one roti and sandwitch it by covering it with another rolled roti. Stick the edges by pressing with fingers.  Now roll it with very light hand.
8.Put the rolled parantha on heated tava or non stick pan.9. When it seems dry and turn it to the other side and apply oil to both sides. 
10. Make it crisp.
11. Crispy kheera (cucumber) parantha is ready to serve.
Enjoy Healthy Cooking!!! 
See related recipes
Papaya Parantha
Kuttu &sweet Potato Roti
Ajvaini Lacha Parantha
Boiled Rice Parantha
Bread Loaf
Mooli Wali Makki roti
Plain Makki Ki Roti
sweet Bread (Tutti Frutti)
Pita Bread 
Plain Kulcha 
Ajvain Leaves (stuffed) Parantha 
                                     ---------------
All rights reserved.
Reproduction of the contents of this blog without permission, in whole or in part is prohibited.
Share
Tweet
Pin
Share
No comments
It is said that it is good to eat broccoli raw as cooking destroys some of its antioxidants.  It has vitamin C, calcium, anti cancer and anti viral properties. I have made its parantha.  Hereafter is its full recipe:
Ingredients
1 small size broccoli
1 small onion
1 fresh green chili
salt to taste
1 tsp of garam masala
1 tsp of coriander powder
handful of chopped cilantro
2 cups of wheat flour
1 cup of water
1/4 cup of flour for rolling
oil
Method
1.  Wash and cut broccoli in small florets.  Soak in warm salty water for 10 minutes. Next clean it very carefully to make it worm free.
2. Now take out from water and keep it in any sieve to remove extra moisture for few minutes.
3. Next take broccoli florets in vegetable chopper or in small zar of mixer and pulse it 5-6 times or grate it with grater box.  If doing it in mixer zar, take few pieces at a time. Pulse it the remaining florets similarly. Now take this mixture in a clean cloth and squeeze its water completely. 
4. Peel the onion and ginger.  Now cut roughly chili, ginger and onion. Again pulse them for 4-5 times. 
or
Cut finely onion and ginger with hand if not very good in rolling the stuffed parantha. As done in the mixer zar on pulse contains little bit moisture.
5.  Now mix the broccoli, onion, chili and ginger mixture together. Add salt, coriander powder and garam masala just before we start making parantha.
6. Take the wheat flour in a big bowl and make a soft dough with 1 cup of water.Use squeezed water of broccoli to knead it.  If not sufficient take more normal water.  Keep it aside for 10 minutes.
7.  Now make four balls out of the dough.
8.  Roll it with rolling pin just like roti in round shape.  Put handful of stuffing on it and gather from all sides and make flat ball of it.
9.  Now  roll this stuffed flat ball into the dry flour and slightly press it with hands and then roll it with rolling pin on wooden surface/chakla with very light hand.
10.  Place this stuffed and rolled parantha on the heated tava,/pan etc.  when one side seems dry turn it to the other side.
11.  After that apply oil to both sides and cook it till crisp.
12.  Delectable broccoli parantha/purontha is ready to serve.
Enjoy Healthy cooking!!!
See more recipes:
Kuttu Flour Puda or Chilla    
Chili Chilla  
Spicy Grilled Baby Corn Kabab    
Namkeen Puda or Chilla
Bread Tikki chaat  
Corn stuffed Mirch Pakoras    
Double Colored Rice Poori    
Kale Patra or Patoud
Mathi or Mathiyan    
Papaya Parantha       
Kuttu &sweet Potato Roti      
Ajvaini Lacha Parantha      
Boiled Rice Parantha    
Bread Loaf    
Mooli Wali Makki roti   
Plain Makki Ki Roti   
sweet Bread (Tutti Frutti) 
Totilla's bhatoore
Tortilla Tandoori roti                                       
                                  --------------------
Reproduction of the contents of this blog without permission, in whole or in part is strictly prohibited.
Share
Tweet
Pin
Share
No comments
Jack fruit/kathal is used for making a wide variety of dishes, but its cutting is very tedious and tricky. Often many of my friends buy already cut slices of it from the vegetable market, but on the contrary,  I prefer to buy it as a whole, which is rarely available in the vegetable market.  So, whenever I see a small jackfruit which can be consumed in two or three times, I can't help buying.  Here I have made its parantha with fresh/unripe,young jack fruit. I started to cut it for making sabzi, but it ended up making parantha. It is really worth making.  Here below is its full recipe: 
Ingredients
1 small piece of kathal
1 small onion
1 fresh green chili
salt to taste
1 tsp of garam masala
1/4 tsp of mango powder
1 tsp of coriander powder
handful of chopped mint leaves
handful of drum stick leaves
2 cups of wheat flour
1 cup of water
1/4 cup of flour for rolling
oil
Method
1. First of oil, apply little oil to both hands and knife. Wash, peel and cut kathal in small chunks.
2. Smear the chopper container and blade with little oil too. Next take kathal with 1/2 tsp of oil in vegetable chopper and chop in it very finely.  It takes some time.
3.  Next, take it in a microwave bowl with 1 tsp of oil and mix.  Microwave it for 3 minutes.  After that take out from the microwave, stir and cover with lid. Let it be cool off completely.
4. Peel the onion and ginger. Chop onion and ginger very finely with hand instead of in vegetable chopper, if not very good in rolling the stuffed parantha.
5.  Now mix the completely cool kathal, onion, chili and ginger, mint leaves and chopped drum stick leaves, mix together. Add salt, coriander powder, mango powder and garam masala just before we start making parantha.
6. Take the wheat flour in a big bowl and make a soft dough with 1 cup of water. If not sufficient take more little bit normal water.  Keep it aside for 10 minutes.
7.  Now make four balls out of the dough.
8.  Roll it with rolling pin just like roti in round shape. Put handful of stuffing on it and gather from all sides and make flat ball of it.
9.  Now  roll this stuffed flat ball into the dry flour and slightly press it with hands and then roll it with rolling pin on wooden surface/chakla with very light hand.
10.  Place this stuffed and rolled parantha on the heated tava,/pan etc.  When one side seems dry turn it over to the other side.
11.  After that apply oil to both sides and cook it till crisp.
12.  Delectable kathal parantha/purontha is ready to serve.
Enjoy Healthy cooking!!!
See more recipes:
Kuttu Flour Puda or Chilla    
Chili Chilla  
Spicy Grilled Baby Corn Kabab    
Namkeen Puda or Chilla
Bread Tikki chaat  
Corn stuffed Mirch Pakoras    
Double Colored Rice Poori    
Kale Patra or Patoud
Mathi or Mathiyan    
Papaya Parantha       
Kuttu &sweet Potato Roti      
Ajvaini Lacha Parantha      
Boiled Rice Parantha    
Bread Loaf    
Mooli Wali Makki roti   
Plain Makki Ki Roti   
sweet Bread (Tutti Frutti) 
Totilla's bhatoore
Tortilla Tandoori roti                                       
                                  --------------------
Reproduction of the contents of this blog without permission, in whole or in part is strictly prohibited.
Share
Tweet
Pin
Share
No comments
Moringa/drumstick leaves contain seven times the vitamin c of oranges, 4 times the vitamins A of the carrots, four times the calcium of milk, three times the potassium of bananas and two times the proteins of yogurt. In fact, these leaves are power house of nutritional value.  Last Sunday I made its leaves parantha in breakfast.  Here below is its full details:
 Ingredients
1.5 cups of wheat flour
1 cup of besan
3-4 handfuls of finely chopped drum stick/moringa leaves
1/2 cup of finely chopped cilantro with its stems
salt to taste
1 tsp of crushed ajvain
1 tsp of cumin seeds
1 tsp of garam masala
2 finely chopped fresh chili of any color
1 tbsp of finely chopped onion
1 tsp of grated ginger
1 cup of water for making dough
oil
Method
1. Sieve besan and wheat flour.  Add salt, garam masala, cumin seeds, ajvain seeds and mix well.
2. Now add onion, ginger, fresh chilies, drum sticks leaves, cilantro and mix well.
3. Make a soft dough with 1 cup of water.  Keep it for 10 minutes for rest. 2 tbsp of water is left after kneading the dough.
4.  Now again make the dough smooth  with hands for few minutes.
5.  Heat a tawa or flat pan on medium heat.
6.  Now make five balls out of it for making four paranthas.
7. Roll a round roti with rolling pin by applying plethan ( dry wheat flour) .
8.  Now in the centre of this rolled roti apply 1/4 tsp of oil and fold  it in any shape.  Here I have folded in sqaure shape.
9.  Place the rolled parantha on the tawa.  when it seems dry from one side, flip it over to the other side.
10.  Apply oil to both the sides and cook it till crisp.
11. Crispy drum stick leaves parantha is ready to serve.

Tips:
1. Applying oil to the roti before folding parantha is optional and can be avoided too.
2.  Parantha can be made in any shape.
3.  Round roti can be cooked without oil too.
4.  It tastes great if makes it spicy by putting crushed fresh chilies  which we can crush in mixer grinder.  
Enjoy Healthy Cooking!!!
See Similar posts:
Kuttu &sweet Potato Roti 
Ajvaini Lacha Parantha 
Boiled Rice Parantha 
Bread Loaf 
Mooli Wali Makki roti 
Plain Makki Ki Roti 
sweet Bread (Tutti Frutti)  
Pita Bread   
Plain Kulcha 
Ajvain Leaves (stuffed) Parantha  
Papaya Parantha
Tandoori Roti (microwave)
Methi Wali Makki Roti 
Marua (Sweet Basil) Chutney 
Gobhi Parantha 
Baby corn parantha 
Stuffed Kachalu Parantha 
                                       --------------------------------
All rights are reserved.
Reproduction of the contents of this blog without permission, in whole or in part, is prohibited.
Share
Tweet
Pin
Share
No comments
Taro root and its leaves are used in making various dishes. Few days back, I tried to make its stuffed parantha and roti.  It came out so nice and delicious that I have not imagined to that extent.  Here below is its full recipe how I made it:
Ingredients
1 small sized  boiled kachalu/taro root
1 small finely chopped onion
2 tbsp of chopped onion green leaves
1 finely chopped green chili
1/2 cup of finely chopped cilantro
1 inch piece of grated ginger
salt to taste
1/2 tsp of garam masala
1/2 tsp of ajvain seeds
1 tsp of coriander powder
1/4 tsp of mango powder
For dough
2 cups of wheat flour
1 cup of water
handful of wheat flour for rolling
oil for frying
Method
1. Wash thoroughly with water to remove all the mud and dirt.
2.  Now boil it in pressure cooker for 8-10 minutes depending on the size of the taro root. For this see the post  "how to boil kachalu" in this blog.
3.  Now peel the boiled kachalu after getting it cool off completely.
4.  Now keep it in the refrigerator for 2 to 3 hrs.
5.  Now grate it with grater or cut into pieces and mash with any tong/chimta by holding between the tong and press.  I prefer it to grate rather than mashing.
6.  Before mixing all the ingredients for stuffing, make the dough with water.  Take the same ratio of wheat flour and water.  It should  be soft. Keep it for 10 minutes.

7. Now mix grated kachalu, both the onion, cilantro, fresh green chili, ginger, salt, mango powder, garam masala, coriander powder, ajvain seeds/carom seeds and mix with hand.
8. Heat the tawa on medium flame.
9.Now make the balls out of dough.
10. Take one dough ball and roll it with rolling pin in round shape with the help of dry flour.
11. Place handful of kachalu mixture on rolled roti and gather it from all sides and make flat ball out of it. Now press gently with palm to make it more flatten. Now apply dry flour to it and roll it on wooden surface with rolling pin.
12. Next place it on heated tawa or  non stick pan. When one side seems dry, turn it to another side and apply oil to both the sides and cook till it gets crispy.
13. Tempting kachalu parantha is ready to serve. It can be served with curd, butter, pickle and chutney.
Stuffed Roti
1. Follow the above mentioned method for parantha  from steps 1 to 11.
2. After step 11, place the rolled stuffed roti on heated tawa.  When it seems dry from one side turn it to the other side.
3.  Now cook it by pressing some small kitchen cloth towel from both the sides or puff it on direct flame by turning very quickly on both the sides.
4,  Swadisht stuffed kachalu roti is ready to serve. Little pure ghee can be applied to it. Enjoy it with curd.
Enjoy Healthy Cooking!!!
See more recipes:
Kuttu Flour Puda or Chilla    
Chili Chilla  
Spicy Grilled Baby Corn Kabab    
Namkeen Puda or Chilla
Bread Tikki chaat  
Corn stuffed Mirch Pakoras    
Double Colored Rice Poori    
Kale Patra or Patoud
Mathi or Mathiyan    
Papaya Parantha       
Kuttu &sweet Potato Roti      
Ajvaini Lacha Parantha      
Boiled Rice Parantha    
Bread Loaf    
Mooli Wali Makki roti   
Plain Makki Ki Roti   
sweet Bread (Tutti Frutti) 
Totilla's bhatoore
Tortilla Tandoori roti    

Chili Parantha
Gobhi Parantha 
Stale Roti Chaat
All Purpose flour/Maida dhokla 
                                            --------------
Reproduction of the contents of this blog, without permission, in whole or in part, is strictly prohibited.
Share
Tweet
Pin
Share
No comments
Yard long beans are a good source of protein, vaitmin A, vitamin C, potassium etc etc. Generally it is eaten as sabzi. Today I have made its parantha/paratha/puronthe and it turned out very well.  Here below is how I made it:
Ingredients
2 cups of wheat flour
10 yard long beans
1 fresh green chili
1 small onion
1 inch piece of ginger
salt to taste
1 tsp of cumin seeds
1/2 tsp of garam masala
oil
Method
1.  Cut the yard long beans into small pieces. Now take beans ginger and green chilies into vegetable copper .  And chop it very fine. Now chop the onion with knife or in veg chopper.
2.  Now take all the chopped beans, green chili, ginger onion, cumin seeds, salt, garam masala and wheat flour/aata.  Make a soft dough just like we make  for chapatis or for any other paratha.  More the beans less the water will be used for dough.
3. Keep it rest for 10 minutes.
4.  Heat the tava, pan. Make balls out of dough.  Now roll the parantha in round shape with rolling pin on chakla/wooden surface or any hard surface with the help of dry wheat flour/plethan.
5.  Place the rolled parantha on the hot tava. When it seems drying, turn it to the other side.
6.  Apply the oil to the both sides and cook till crisp..
7.  After getting crist, take out from the tava.  Delicious yard long beans is ready to serve.
Enjoy Healthy Cooking!!!
See more recipes:    
Kuttu Flour Puda or Chilla        
Chili Chilla        
Spicy Grilled Baby Corn Kabab       
Namkeen Puda or Chilla        
Bread Tikki chaat       
Corn stuffed Mirch Pakoras        
Double Colored Rice Poori        
Kale Patra or Patoud       
Mathi or Mathiyan         
Papaya Parantha     
Kuttu &sweet Potato Roti        
Ajvaini Lacha Parantha      
Boiled Rice Parantha     
Bread Loaf     
Mooli Wali Makki roti   
Plain Makki Ki Roti       
 
sweet Bread (Tutti Frutti) 
Stale roti chilla  
Makki ka Plain Chilla
Dibba roti 
                                     ------------------------
Reproduction of the contents of this blog, without permission, in whole or in part, is strictly prohibited.
Share
Tweet
Pin
Share
No comments
Onion is used in almost all dishes whether it is sabzi, pulses, chutney, rice, and snacks.  It enhances the taste of every dish.  Today I am writing the recipe of onion parantha.  Here it is:
Ingredients
2 big onion
handful of chopped cilantro
1"of ginger piece
2 fresh green chilies finely chopped
salt to taste
1 tsp of coriander powder
1/2 tsp of garam masala
3/4 tsp of mango powder
1/4 tsp of red chili powder(optional)
oil
2 cups of wheat flour
1 cup of water
1/4 cup wheat flour for rolling paranthas
1/2 tsp of cumin or ajvain seeds
Method
1.  Peel the onion and ginger and cut roughly.  Chop it into chopper.
2.  Now squeeze the chopped onion  through a neat and clean cloth. Keep the squeezed water for making dough.
3.  Add the cilantro, green chilies, amchoor, coriander powder, red chili powder, and garam masala to the shopped and squeezed onion. Salt is added just before we are ready to  roll it.
4.  Add the ajvain or cumin seeds to the dry flour. Now make a smooth dough with water as written above in ingredients list.  Keep it aside for 10 minutes.  Now again make it smooth with hands
5.  Heat the tava/pan on medium flame.
6.  Now it is the time to add sat to the mixture.  Mix it properly.  Stuffing is ready
7.  Now make 4-5 balls out of the dough.
8.  Roll this dough ball in round shape with rolling pin by applying dry flour (plethan)
9. Next keep handful of stuffing on it and gather it from all its sides and make a ball again . Now press it with your palm slightly and it will be flat roundel.
10.  Now roll it again with rolling pin by applying dry flour.
11.  Place this rolled paratha on the heated tava. When it seems dry turn it to the other side.
12. Apply the oil to both sides and cook it crisp by pressing with spatula.
13.  Crispy onion paratha is ready to serve.
Enjoy Healthy Cooking!!!
See more recipes:
Kuttu Flour Puda or Chilla    
Chili Chilla  
Spicy Grilled Baby Corn Kabab    
Namkeen Puda or Chilla
Bread Tikki chaat  
Corn stuffed Mirch Pakoras    
Double Colored Rice Poori    
Kale Patra or Patoud
Mathi or Mathiyan    
Papaya Parantha       
Kuttu &sweet Potato Roti      
Ajvaini Lacha Parantha      
Boiled Rice Parantha    
Bread Loaf    
Mooli Wali Makki roti   
Plain Makki Ki Roti   
sweet Bread (Tutti Frutti) 
Totilla's bhatoore
Tortilla Tandoori roti    

Chili Parantha
Gobhi Parantha 
Stale Roti Chaat
All Purpose flour/Maida dhokla 
                                                    -------------
Reproduction of the contents of this blog, without permission, in whole or in part, is strictly prohibited.
Share
Tweet
Pin
Share
No comments
Baby corn also known as candle corn.  It is very low in fat but still a good source of fiber and goes well with almost all vegetables. Today I am writing about baby corn parantha. Here below is its full recipe: 
Ingredients
8-10 fresh babycorn
1" piece of ginger
1 small onion
2 fresh green chili
salt to taste
1/2 tsp of mango powder
1 tsp of garam masala
1 tsp of coriander powder
handful of chopped cilantro
2 cups of wheat flour
1 cup of water
1/4 cup of flour for rolling
oil
(for 4 parantha)
Method
1.  Wash and grind the baby corns in the vegetable chopper till fine granules or alternatively  it can be done on pulse in mixer grinder small zar. Its granules seems just like tiny yellow beads. Next take in a clean cloth and squeeze it with both hands.
2. Peel the onion and ginger.  Now cut finely chili, ginger,cilantro and onion.
3.  Now mix the  squeezed baby corn chopped granules, onion, chili and ginger mixture together. Add salt, coriander powder,mango powder and garam masala just before we start making parantha.
4. Take the wheat flour in a big bowl and make a soft dough with 1 cup of water. I have used the water which we squeezed from baby corns too while kneading it. 1 cup of water inludes the squeezed water.   Keep it aside for 10 minutes.
5.  Now make four balls out of the dough.
6.  Roll it with rolling pin just like roti in round shape.  Put handful of stuffing on it and gather from all sides and make flat ball of it.
7.  Now apply dry flour to this stuffed dough ball and slightly press it with hands and then roll it with rolling pin on wooden surface/chakla with very light hand.
8.  Place this stuffed and rolled parantha on the heated tava,/pan etc.  when one side seems dry turn it to the other side.
9.  After that apply oil to both sides and cook it till crisp on medium heat.
10. Healthy and delicious baby corn parantha/purontha is ready to serve.
Enjoy Healthy cooking!!!
See more recipes:
Kuttu Flour Puda or Chilla    
Chili Chilla  
Spicy Grilled Baby Corn Kabab    
Namkeen Puda or Chilla
Bread Tikki chaat  
Corn stuffed Mirch Pakoras    
Double Colored Rice Poori    
Kale Patra or Patoud
Mathi or Mathiyan    
Papaya Parantha       
Kuttu &sweet Potato Roti      
Ajvaini Lacha Parantha      
Boiled Rice Parantha    
Bread Loaf    
Mooli Wali Makki roti   
Plain Makki Ki Roti   
sweet Bread (Tutti Frutti) 
Totilla's bhatoore
Tortilla Tandoori roti 
Gobhi Parantha 
Bhindi Parantha                                         --------------------
Reproduction of the contents of this blog without permission, in whole or in part is strictly prohibited.
Share
Tweet
Pin
Share
No comments
Bhindis are known as okras/gumbo/lady fingers etc.  It has many health benefits.  It is said that it is very good for diabetic patients, helpful in ease constipation,  good for eyes, helpful in weight loss, and good for immune system.  Seeing its numerous health benefits, yesterday tried its parantha.  Here I used the stale one.  Making its parantha is very easy.  Here below comes the whole process how I made it:
 Ingredients
15 small sized stale okras
1 inch ginger
1 small sized onion
2 green chilies
handful of cilantro
1.5 cups of wheat flour
1/2 cup of basen
salt to taste
1/2 tsp of garam masala
1/2 tsp of coriander powder
1/2 tsp of ajvain seeds
1 tsp of lime juice
oil 
Method
1.  For making paranthas, take stale okras/bhindis/ladyfingers/gumbo.  Stale bhindis are perfect for it as the fresh ones are lacy, slimy or sticky in nature..  
2.  Wash and dry with cloth.

3. Slit the okras so that worms can be seen easily.  Now take in chopper zar with onion, ginger and green chilies.  Chop it very finely.  Alternatively it can be chopped in small zar of blender on pulse for 5 to 6 times.
4.  Now take wheat flour and basen.  Add salt, garam masala, coriander powder, ajvain seeds and lime juice.  Mix it well.
5.  Next add finely chopped cilantro and finely chopped okras which we have chopped in chopped all along with onion, green chilies and ginger.
6.  Take a smooth dough with water.  
6.  Keep it aside for few minutes.  Now dough is ready.
8. Heat a tawa or pan.  Make small balls/pedas from the dough.  
9. Roll it in round shape on wooden surface/chakla with belan/rolling pin with the help of dry flour.
10. Next place the rolled paratha/roti on the heated tawa.  When it seem dry, turn it to the other size.
11. Apply oil to both sides and make it crisp while pressing with spatuls/turner/palta on medium heat.
12.  Crisp okra prantha is ready to serve.
Enjoy Healthy Cooking!!!
See more recipes:
Kuttu Flour Puda or Chilla    
Chili Chilla  
Spicy Grilled Baby Corn Kabab    
Namkeen Puda or Chilla
Bread Tikki chaat  
Corn stuffed Mirch Pakoras    
Double Colored Rice Poori    
Kale Patra or Patoud
Mathi or Mathiyan    
Papaya Parantha       
Kuttu &sweet Potato Roti      
Ajvaini Lacha Parantha      
Boiled Rice Parantha    
Bread Loaf    
Mooli Wali Makki roti   
Plain Makki Ki Roti   
sweet Bread (Tutti Frutti) 
Totilla's bhatoore
Tortilla Tandoori roti

Gobhi Parantha 
Chili Parantha 
Mooli Parantha 
Marua Spicy Parantha 
Pumkpkin Parantha 
Ajvaini Laccha Parantha 
Besan Ka Parantha 
Sweet Banana Parantha 
Cabbage Parantha 
                                               ---------------
Reproduction of the contents of this blog, without permission, in whole or in part is strictly prohibited. 
Share
Tweet
Pin
Share
No comments
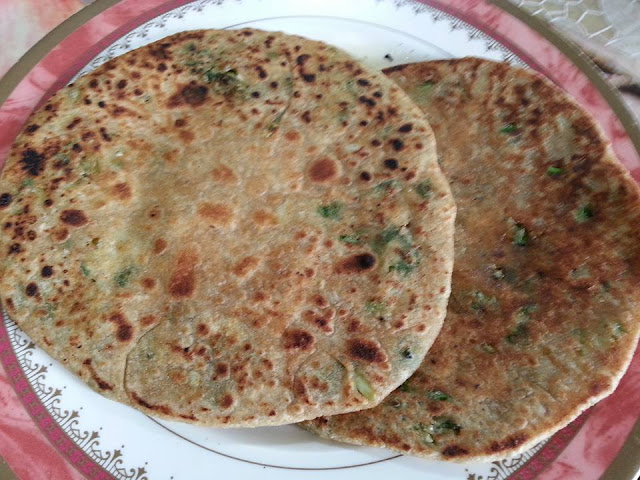
Gobhi/cauliflower purontha/parantha is very popular in Haryana and Punjab region.  It is made in the breakfast.  Becomes more tasty if accompanied with butter. Its making is very easy and simple.  Here below is the whole process how we can make it:
Ingredients
1 small size cauliflower
1" piece of ginger
1 small onion
1 fresh green chili
salt to taste
1 tsp of garam masala
1 tsp of coriander powder
handful of chopped cilantro
2 cups of wheat flour
1 cup of water
1/4 cup of flour for rolling
oil
Method
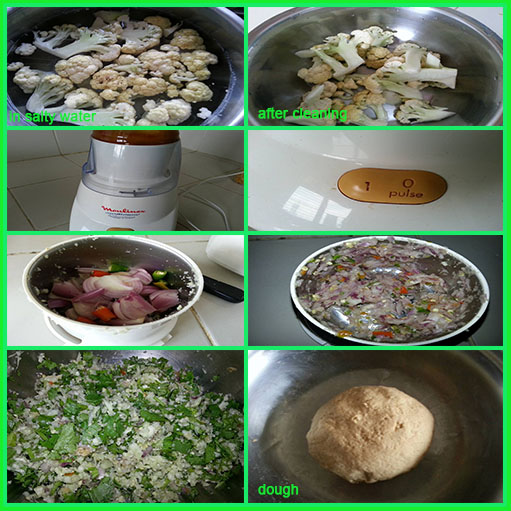
1.  Wash and cut cauliflower in small florets.  Soak in warm salty water for 10 minutes. Next clean it very carefully to make it worm free.
2. Now take out from water and keep it in any sieve to remove extra moisture for few minutes.
3. Next take few florets in small zar of mixer and pulse it 5-6 times or grate it with grater box. Pulse t the remaining florets similarly.
4. Peel the onion and ginger.  Now cut roughly chili, ginger and onion. Again pulse them for 4-5 times. 
or
Cut finely onion and ginger with hand if not very good in rolling the stuffed parantha. As done in the mixer zar on pulse contains little bit moisture.
5.  Now mix the cauliflower, onion, chili and ginger mixture together. Add salt, coriander powder and garam masala just before we start making parantha.
6. Take the wheat flour in a big bowl and make a soft dough with 1 cup of water. Keep it aside for 10 minutes.
7.  Now make four balls out of the dough.
8.  Roll it with rolling pin just like roti in round shape.  Put handful of stuffing on it and gather from all sides and make flat ball of it.
9.  Now  roll this stuffed flat ball into the dry flour and slighly press it with hands and then roll it with rolling pin on wooden surface/chakla with very light hand.
10.  Place this stuffed and rolled parantha on the heated tava,/pan etc.  when one side seems dry turn it to the other side.
11.  After that apply oil to both sides and cook it till crisp.
12.  Delectable gobhi parantha/purontha is ready to serve.
Enjoy Healthy cooking!!!
See more recipes:
Kuttu Flour Puda or Chilla    
Chili Chilla  
Spicy Grilled Baby Corn Kabab    
Namkeen Puda or Chilla
Bread Tikki chaat  
Corn stuffed Mirch Pakoras    
Double Colored Rice Poori    
Kale Patra or Patoud
Mathi or Mathiyan    
Papaya Parantha       
Kuttu &sweet Potato Roti      
Ajvaini Lacha Parantha      
Boiled Rice Parantha    
Bread Loaf    
Mooli Wali Makki roti   
Plain Makki Ki Roti   
sweet Bread (Tutti Frutti) 
Totilla's bhatoore
Tortilla Tandoori roti                                        
                                            --------------------
Reproduction of the contents of this blog without permission, in whole or in part is strictly prohibited.
Share
Tweet
Pin
Share
No comments
Older Posts

About me

About Me


COOKING SPEAKS TO ALL MY SENSES

Follow Us

  • facebook
  • twitter
  • instagram
  • Google+
  • pinterest
  • youtube

Categories

recent posts

Sponsor

Facebook

Blog Archive

  • August 2018 (62)
  • July 2018 (4)
  • June 2018 (4)
  • May 2018 (3)
  • April 2018 (4)
  • March 2018 (4)
  • February 2018 (2)
  • January 2018 (3)
  • December 2017 (4)
  • November 2017 (3)
  • October 2017 (3)
  • September 2017 (4)
  • August 2017 (3)
  • July 2017 (5)
  • June 2017 (4)
  • May 2017 (2)
  • April 2017 (3)
  • March 2017 (3)
  • February 2017 (3)
  • January 2017 (4)
  • December 2016 (4)
  • November 2016 (4)
  • October 2016 (4)
  • September 2016 (5)
  • August 2016 (4)
  • July 2016 (3)
  • June 2016 (4)
  • May 2016 (3)
  • April 2016 (4)
  • March 2016 (4)
  • February 2016 (3)
  • January 2016 (4)
  • December 2015 (4)
  • November 2015 (5)
  • October 2015 (4)
  • September 2015 (4)
  • August 2015 (5)
  • July 2015 (1)
  • November 2014 (1)
  • July 2014 (2)
  • June 2014 (2)
  • May 2014 (2)
  • April 2014 (1)
  • March 2014 (2)
  • February 2014 (2)
  • January 2014 (5)
  • December 2013 (4)
  • November 2013 (2)
  • October 2013 (4)
  • September 2013 (2)
  • August 2013 (2)
  • July 2013 (4)
  • June 2013 (3)
  • May 2013 (4)
  • April 2013 (3)
  • March 2013 (4)
  • February 2013 (4)
  • January 2013 (4)
  • December 2012 (5)
  • November 2012 (3)
  • October 2012 (5)
  • September 2012 (6)
  • August 2012 (5)
  • July 2012 (4)
  • June 2012 (5)
Created with
Copyright © FUN COOKING