• HOME
  • ABOUT
  • CONTACT US
  • DISCLAIMER
  • SITEMAP
  • PRIVACY
facebook twitter instagram pinterest bloglovin Email

FUN COOKING

Find Good and Natural Recipes

Fish Ball With Onion Pepper Sauce

Fish Ball with onion pepper sauce is a very delectable dish. You can have it with steamed rice or vegetable rice or simple noodles. Simple and easy to cook take less than few minutes but fish ball in onion pepper sauce is really an awesome dish.Fish has a reputation for being low calorie, high protein “brain food,” thanks to the long strands of polyunsaturated essential omega-3 fatty acids (popularly referred to as “omega-3s”) found in fish oil. The human body can’t naturally produce omega-3s, but yet they’re needed for a healthy body, inside and out. Eating fish as little as once a week can help preserve gray-matter neurons.One of the biggest drawbacks to a low-fat diet is you often deprive your skin and hair of the healthy fat it needs, leaving it dull and dry. The omega-3s in fish are exactly the type of healthy fat to eat to keep your skin looking nourished and your hair shiny.Saltwater fish is a sun-less source of vitamin D, which scientists say can help ward off disease, promote bone health, and with the help of the omega-3s in fish, ward off cognitive decline. A recent study of 188 men found that those who ate more fresh fish — along with other healthy foods such as fruits, vegetables, and whole grains — had stronger swimmers than those who ate unhealthy diets. Researchers say that more study needs to be done, but preliminary data shows that the better the participant’s diet, the stronger the shape and mobility of the sperm he produced.
I am sure all this health benefits will add on as a good reason to try this delicious fish ball with onion pepper sauce.

Fish Ball With Onion Pepper Sauce

Ingredients
  • 8 to 9  meaty white fish steaks
  • 1 seasoning cube
  • 2 to 3 tbsp well beaten egg
  • 1 bell pepper cubed
  • 2 onion cubed
  • 1 tsp garlic chopped
  • 2 tbsp tomato garlic sauce
  • 1 tbsp tomato sauce
  • 1 tsp hot sauce (optional)
  • 1 tbsp cornflour
  • 1 cup chicken stock
  • 1 tbsp oil
  • 1 tbsp lemon juice
  • to taste salt and pepper
Fish Ball With Onion Pepper Sauce
Cooking Directions
  1. Steam the fish steaks. Now remove the skin and debone fish carefully. Take all of them in a bowl add seasoning cube, egg. Mix well. Make small balls and keep aside. Those who don't want to have fried fish balls, you can steam the balls and pour the sauce or you can use air fryer to fry the balls that will also keep the oil count low or deep fry them in oil. Choices are all yours to follow.
  2. Heat oil in a pan add garlic, as it turns to go brown add onion cubes fry on a high flame a little then add bell pepper. Stir and then add 1 cup of chicken stock/ fish stock/ vegetable stock. Let it come to boil mix all the sauces and then add .Give a good stir. Mix cornflour with water and add to the sauce. As it thickens and you get a good thick saucy consistency, put off the flame. Add lemon juice and mix well.
  3. Arrange the fish ball in a serving platter and then pour the sauce over them, so that the fish balls are well covered. You can top it with your favorite greens .Enjoy fish ball with onion pepper sauce.
Fish Ball With Onion Pepper Sauce

Be Happy And Stay Healthy.


Share
Tweet
Pin
Share
No comments
Chicken Spring Roll

Spring rolls of different shapes, sizes and fillings have been a popular snack in Asia for centuries. It is believed that spring rolls originated from China. It was a seasonal food consumed during the spring, started as a pancake filled with the new season's spring vegetables, a welcome change from the preserved foods of the long winter months.Today I am sharing a very easy and quick spring roll recipe.I am sure you will love it.The best part of spring roll stuffing is that you can fill it up with any winter veggies, sprout, fish and meat and make it as healthy as you can just keep in mind that the stuffing you put in is dry or else it will make the spring roll wrapper soggy and then it's tough to fry. In today's recipe if used a simple yet yummy stuffing,  you can even use leftover chicken to make this stuffing. Enjoy Chicken spring roll.


Chicken Spring Roll

Ingredients
  • 10 spring roll sheet
  • 1 cup cooked chicken shredded
  • 1 onion finely chopped
  • 1 bell pepper finely chopped
  • 1tsp soy sauce
  • to taste salt n pepper
  • 1 cup oil for frying
Cooking Directions
  1. In a bowl take shredded chicken, onion, bell pepper, soy sauce, salt n pepper. Mix well .Defrost the wrapper for 30 minutes before using or as per package instruction. Take each wrapper on the work surface in a rectangular way. Place 1 tbsp of stuffing in one end of the wrapper now roll tight and then fold from the left n then from right. Make a envelop Finally roll it completely and seal the edge using a little cornflour/wheatflour-water mixture. Heat the oil in a deep non- stick pan and deep-fry, 2 rolls at a time on a medium flame, till they turn golden brown in colour from all the sides.Then place them all in a kitchen paper so the excess oil get absorbed.Now place them on a plate and serve immediately with your favorite hot sauce. I serve it with Thai chilly garlic sauce.
  2. For those who think it is quiet tough to fold the spring roll , you can put the stuffing and then fold like a triangle. It look quiet interesting, and then fry. Quick fix if you are in hurry or not too confident to fold spring roll correctly. Have fun with your folds and enjoy delicious crisp rolls or triangles..=P =D.
Chicken Spring Roll

Be Happy And Stay Healthy.
Share
Tweet
Pin
Share
No comments

Burnt garlic and sesame beetroot is a very healthy and quick to make recipe. Garlic is very useful in winter it contains Allicin, which contributes to its antimicrobial, antifungal, expectorant and immune stimulant qualities.Consume garlic in your diet, clinical trials has shown garlic increases the quality, quantity and killing power of natural killer cells tenfold! This certainly is reason enough to take garlic from the beginning to the end of flu season. On the other hand there are some foods we can eat this winter that will genuinely do us good.One front runner is beetroot.It contains good amount of calcium, magnesium, iron, phosphorous, potassium, manganese, folic acid and vitamin C.The natural dietary nitrates in beetroot have been found to have two powerful physiological effects, they dilate (widen) the blood vessels, which can both reduce blood pressure and increase blood flow to muscles and the brain. In turn, this increases oxygen supply to the muscles for energy production which is especially beneficial during intensive exercise. So now you know how health packed recipe is burnt garlic and sesame beetroot and it is awesomely delicious. So give it a try, stay healthy and enjoy the warmth of the season.


Burnt Garlic And Sesame Beetroot

Ingredients
  • 1 cup beetroot cubes blanched
  • 8 to 10 baby garlic
  • 1 small onion cube flakes (optional)
  • 1tsp sesame seed
  • 1 tsp tomato garlic sauce
  • 1/2 tsp soy sauce
  • 1 tsp lemon juice
  • 1 tsp sesame oil/ vegetable oil
  • to taste salt to pepper
Cooking Directions
  1. Heat oil then add baby garlic and sesame. Let them both brown. Add onion flakes let them just go transparent then add the blanched beetroot. Add salt , tomato garlic sauce, soy sauce and pepper. Mix well. Add lemon juice and put off the flame. Your burnt garlic and sesame beetroot is ready to serve. Serve on a bed of iceberg lettuce. Relish this anytime healthy dish burnt garlic and sesame beetroot.

Be Happy And Stay Healthy.


Share
Tweet
Pin
Share
No comments

Last Sunday I thought to experience some exquisite Asian Cuisine. So try to make a delicious Mushroom fried rice paired with Thai Lamb curry. Thai Lamb curry is bit hot but worth trying once in a while. Mushroom are very healthy as it is loaded with nutrients our body need to generate energy and repair cells- including digestive enzymes, a spectrum of b vitamins and vitamin D2. The impact of mushroom of immunity is remarkable. Their curative powers have been shown to improve eyesight…..hearing…circulation…impotency..migraine headaches…..tumors and infections. So a very healthy rice paired with lamb curry is a very delicious combo worth try.


 Fried Mushroom Rice With Thai Lamb Curry

Ingredients

  • 10 to 12 button mushroom cut in to halves
  • 2 tsp dark soy sauce
  • 2 tsp finely chopped garlic
  • 1 tsp finely chopped ginger
  • handful cashew
  • 1/2 tsp sugar
  • 2 cup cooked rice
  • 2 tsp vegetable oil
  • to taste salt and pepper
  •  For Thai lamb curry
  • 700 grm boneless lean lamb
  • 1 large onion finely chopped
  • 1 tbsp ginger garlic chopped
  • 1 stalk lemon grass
  • 1 to 2 tbsp Thai red curry paste / or to taste according to your choice of heat
  • 2 kaffir lime leaves
  • 1 cup tomato puree
  • 1 cup coconut milk
  • 2 tsp oil
  • 1/2 cup hot water
Cooking Directions

  1. Heat oil in a pan. Then add chopped garlic and ginger. Fry till they are fragrant. Now add the cashew. Stir and fry the cashew. Now add the stem off washed mushroom. Stir with salt pepper and soy sauce. Stir till the mushroom are cooked. Now add the boiled rice and sugar. Adjust seasoning. Mix well.
  2. For Thai lamb curry.
  3. Take a heavy bottom pan 2 tsp of oil. Now gently stir onion and ginger garlic chopped and lemon grass, stirring till they are often tender. Stir the curry paste ( make sure this stuff is very hot so add according to your taste) and kaffir lime leaves. Till they are fragrant. Now add the lamb and tomato puree. Stir well. Now add the hot water. Let the curry comes to boil. Now lower the heat and let it cook in a medium heat. Till the meat is half done. Then add coconut milk. Cook in a low heat till the lamb is tender. Stir occasionally. Thai lamb curry is usually paired with jasmine rice but give it a try with mushroom rice.I also serve chilly lime vinegar with it to make the dish more perfect. I am sure you will love the new combo.
Be Happy And Stay Healthy.


Share
Tweet
Pin
Share
No comments

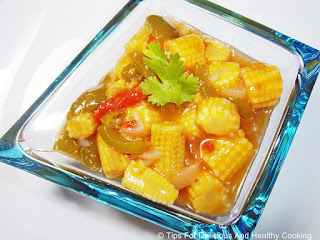
Temperature in my town is raising and it’s too hot and so I look for dishes which are light yet delicious and give you a very fresh feeling . Pepper and corn are two favorite ingredients of mine and in a summer day what can be more refreshing than lemon. So when all go together something delicious is about to happen so here comes for you an awesome summer dish pepper and baby corn in lemon sauce.


  Pepper n Baby Corn in Lemon Sauce

    Ingredients
  • 1 cup baby corn cut into bite size blanched

  • 1 green bell pepper cut into thin strips

  • 1 tomato skinned seeded cut into thin strips

  • 1 onion chopped

  • 1 tsp garlic chopped

  • ½ tsp ginger chopped

  • 1 tsp chilly garlic sauce

  • 1 tsp lemon rind

  • 1 to 2 tbsp lemon juice

  • 1 ½ cup chicken stock/ vegetable stock/ water

  • ½ tsp sugar (optional)

  • 1 tbsp sesame oil

  • to taste salt and pepper


Cooking Direction
Heat sesame oil then add the chopped garlic. Stir for 2 sec then add the onion and ginger. Stir for another 2 to 3 sec. Then add the chopped green bell pepper and blanched baby corn. Stir and cook for a minute. Add the chicken stock or whatever you are using or handy to you. Let it boil for a minute. Then add chilly garlic sauce, salt, pepper and sugar( if using). Cook for another few second then mix cornflour with water and add to the gravy. Cook for another minute or two.When the gravy starts to thicken add lemon rinds and lemon juice. Put off the flame. Cover and give 5 to 6 minutes standing time so that the flavor of lemon get well mixed in the sauce. Serve hot with bread rolls.


Be Happy And Stay Healthy.


Share
Tweet
Pin
Share
No comments

Begedil is a very popular Malay appetizer. Potato cutlet or potato patties are known as Begedil in Malaysia. It is very easy to make quick dish and those who are new to Malaysian cuisine then this dish is great to start with. With potatoes you can add green peas which are rich in iron and vitamin C, which helps to maintain our immune system, and carrots which provide a lot of nutrition to our body. This is indeed a great party food and you can enjoy with a tall glass of chilled mocktail. I am sure you will love this quick easy and delicious Malaysian appetizer.


Ingredients:

Big potatoes 3( peeled washed and cut into circles)
Spring onion 1 bunch finely chopped
Shallots 1 cup fried
Green peas ½ cup
Carrot ½ finely shredded
Turmeric powder 1tsp
Cilantro handful finely chopped
White pepper powder ½ tsp
Eggs 1 to 2 (beaten)
Oil for deep frying
Salt and pepper to taste

Chilly garlic soy sauce
Sweet Soy sauce 4tbsp
Chilly sauce 2tsp
Fried garlic paste 1/2 tsp tsp

Procedure:

Traditional recipe calls for deep fry the potato slices and drains oil then mash them in a dry bowl. But I just boiled them on salted water and mashed it . If you have no problem with oil and want to enjoy the real Malaysian taste go for the fried one otherwise take my route. I promise in this way too you will get a very delicious appetizer. One after another add all the other ingredients and mix well. Check the seasoning and shape them in a medium sized ball then press down lightly to make patties shape. Set aside. Now heat enough oil in a deep fryer. Coat each begedil in the beaten egg and fry till lightly golden. Traditionally it is served with chilly sauce but it is bit too hot for me so I make my own dipping sauce. Mix all the sauce ingredients together and your chilly garlic soy sauce is ready. Serve hot begedil with this dipping sauce or you can try it with mayonnaise.


Be Happy And Stay Healthy.


Share
Tweet
Pin
Share
No comments
Older Posts

About me

About Me


COOKING SPEAKS TO ALL MY SENSES

Follow Us

  • facebook
  • twitter
  • instagram
  • Google+
  • pinterest
  • youtube

Categories

recent posts

Sponsor

Facebook

Blog Archive

  • August 2018 (62)
  • July 2018 (4)
  • June 2018 (4)
  • May 2018 (3)
  • April 2018 (4)
  • March 2018 (4)
  • February 2018 (2)
  • January 2018 (3)
  • December 2017 (4)
  • November 2017 (3)
  • October 2017 (3)
  • September 2017 (4)
  • August 2017 (3)
  • July 2017 (5)
  • June 2017 (4)
  • May 2017 (2)
  • April 2017 (3)
  • March 2017 (3)
  • February 2017 (3)
  • January 2017 (4)
  • December 2016 (4)
  • November 2016 (4)
  • October 2016 (4)
  • September 2016 (5)
  • August 2016 (4)
  • July 2016 (3)
  • June 2016 (4)
  • May 2016 (3)
  • April 2016 (4)
  • March 2016 (4)
  • February 2016 (3)
  • January 2016 (4)
  • December 2015 (4)
  • November 2015 (5)
  • October 2015 (4)
  • September 2015 (4)
  • August 2015 (5)
  • July 2015 (1)
  • November 2014 (1)
  • July 2014 (2)
  • June 2014 (2)
  • May 2014 (2)
  • April 2014 (1)
  • March 2014 (2)
  • February 2014 (2)
  • January 2014 (5)
  • December 2013 (4)
  • November 2013 (2)
  • October 2013 (4)
  • September 2013 (2)
  • August 2013 (2)
  • July 2013 (4)
  • June 2013 (3)
  • May 2013 (4)
  • April 2013 (3)
  • March 2013 (4)
  • February 2013 (4)
  • January 2013 (4)
  • December 2012 (5)
  • November 2012 (3)
  • October 2012 (5)
  • September 2012 (6)
  • August 2012 (5)
  • July 2012 (4)
  • June 2012 (5)
Created with
Copyright © FUN COOKING